Making a ROM hack of an old arcade game
(Addendum: Follow along my thought process below with this extra pedagogical material: https://www.slideshare.net/StephenWylie3/process-of-arcade-rom-hacking )
I was invited to take my Giant NES Controller to a recruiting event for work taking place at a local brewery. But you can't just have an NES controller without anything to play, right? Thus, I pitched a couple ideas on custom games to go along with the giant controller since I didn't want participants playing anything standard either. The thing they agreed to was to feature the Tapper arcade game, by Bally/Midway in 1983, but modified to show the brewery's logo instead of being Budweiser-branded like it was originally.

Now you might be thinking Tapper wasn't ever ported to NES, and that's correct. However, with the help of the MAME arcade emulator and a Hyperkin USB->NES adapter, I could add the Giant NES Controller as an input to this old arcade game, and no one would be the wiser. To facilitate this required lots of learning about MAME, though, because I assumed it would just work right away with my controller. However, the inputs have to be set up to look for button presses coming from the controller; by default, it is only listening for the keyboard. The Giant NES Controller is very unwieldy, so I set it up first with one of the regular NES controllers around the house. The first one I tried was flaky, and I got scared for a moment that my project wouldn't work. However, I grabbed a more reliable one that conveyed the correct button presses rock-solid, and luckily my Giant NES Controller worked just as well anyway.
The Tapper hack was done thanks to the help of MAME's awesome tools and a hex editor. I downloaded the ROMs for the game and figured out the naming convention they used to describe what the files are. There are four program ROMs, two background graphics ROMs, at least one foreground graphics ROM, and several others including sound ROMs. Among these, I only needed to edit 3 of the program ROMs and the background ROMs to change the logos on-screen.
The first thing to figure out was how the background tiles were arranged and how the colors were encoded in the background ROMs. Luckily, MAME's tile viewer helped me see which tiles would be where in the memory.

I opened up a hex editor (specifically Hexplorer, which has a color scheme like The Matrix which makes it really easy to detect large vs. small hex values in each byte) to look for similar patterns as what appeared in the tile viewer. I discovered somewhat similar patterns, but not exactly 100% identical. This is because each background ROM actually has a two-bit encoding per pixel of the tile. One ROM contains a background color of index 0-3 and the other ROM contains the palette number of 0-3. Thus, two different-colored pixels could have the same background color index but a different palette number, making them appear different in the game but indistinguishable from each other in the color-index file viewed in the hex editor. I experimented with editing the tiles, and my first couple attempts did not yield the desired results, but eventually I got the hang of it. It's a very tedious process to do by hand.

The first step is to see how many pixels each tile is in height, and then line up the hex editor so it seems like each change in data or each pattern seems to take up that many rows. (I was afraid the graphics would be compressed with RLE at a minimum, but was extremely pleased that they used just a strange encoding scheme rather than any compression.) This gives you a feel for how many bytes there are per row. Note there are only two bytes per row, and with eight pixels per row, this means each pixel is encoded with just two bytes in each file. It was easier to determine this by looking at the solid colors at the very beginning of the tile files rather than trying to spot a particularly distinctive tile with a letter or graphic because rendering in your head what (for instance) 0x55 looks like versus 0x17 just doesn't come quickly.
The next thing was to rearrange the tile order on the screen so I could have it say Community. Community's logo is shorter but wider than Budweiser, so I wanted the tiles remapped so I could maximize the space where I needed it. Now on top of doing pattern recognition for the background ROMs to find the right tile number, I had to analyze the program ROMs to find out how they actually drew the backgrounds. Luckily, this was fairly easy to do. I found out that each tile is represented by two bytes, and there are 32*20 tiles on-screen per level. Thus, there are 1280 bytes in each screen, and roughly 16K worth of screens. But I didn't find that out until I used a bit of intuition while searching the ROMs for the clues from the tile viewer.

Because the tile information is in program ROMs 1 & 2 (zero-based, as in 0, [1, 2], 3), this presented yet another problem: whenever you change the contents of these ROMs without modifying the checksum in ROM 3, you will get a ROM error corresponding to whichever one(s) are wrong when you boot the game next. I eventually learned how to modify the checksum, but not without using the MAME debugger. This was a real trip, because I used the debugger to figure out when the memory address for any byte in the string "ROM ERROR" was read. (I was extremely fortunate that they used ASCII encoding for this string, otherwise it might have never been apparent where this occurred!) Once the debugger read this address, it continued to read the other addresses in sequence, so I stepped back in the debugger to find out what code caused all the bytes in the ROM to be read. It ended up being somewhat of a hassle to figure the checksums each time, but then a mega hassle to program them in, especially for ROM 3, as you end up creating a circular reference. For instance, if ROM 3 calculates its own checksum to be 1 more than what is programmed into itself, when you modify it to be 1 more, then it calculates it to still be 1 more than the new value you just wrote in. :-P I knew I would be modifying the tile map in ROMs 1 & 2 a whole bunch before I was finally done, so I ended up replacing the code that verifies the checksum with a bunch of NOP instructions so that the game would never call the code that calculates the checksum at boot.
The final thing was to perfect the artwork. Stacy hand-traced the Community logo scaled down to the right size and with the respective palette. I wrote a program that would take a .BMP file consisting of this imagery, along with a "tile file" and "color file", and overwrite the part of the ROMs designated in the tile file with the appropriate 2-bit representation of the colors as dictated by the color file. The color file mapped each color present in the bitmap to a background palette number for that ROM and a color index for the other ROM. The reason I had to write this utility (in Python) was because the other tile editors on romhacking.net didn't seem to be up to the task of parsing old arcade ROMs correctly. The closest I got was one that added an offset to each tile so that it was scooted left a couple pixels. Also it seems like they aren't accustomed to having to deal with *two* asset files for a single tile. I'll have to clean up this utility so it's a little bit more user-friendly and then share it.
Oh, and one other thing: there's yet another palette setting that gets you *four* groups of four groups of four. :-P So now, besides the 2-bit color index and the 2-bit background palette number, there's actually a tile designator that selects which group of 16 colors applies to the tile. This isn't in the background ROMs, but in the program ROMs. What it seems like to me is that the tile ROMs start in a particular address in memory, and then get aliased (e.g. the contents are all the same between addresses 0x3500, 0x5500, 0x7500, and 0x9500) but the higher-order address bits actually indicate which set of 16 colors get used for that tile. Part of that addressing scheme also seems to indicate if the tile should be drawn right-side up or upside-down, but I've only encountered about 6 spaces in the game where this happens and wasn't able to make it do exactly what I wanted. Originally it had drawn in one tile the upper half of the Budweiser bow, and then mirrored it in the tile below, rather than basically duplicating that tile except drawing it upside-down. I wanted it to be changed to a U shape, so I drew in a U into the background ROMs and then thought I changed the tile map to call the new tile un-reflected, but instead what I ended up with is two parallel bars (the top of the U). So that still has yet to be figured out...
As you can imagine, there was lots & lots of play testing along the way. It is important to make sure all the graphics are working just as you expect, otherwise you might get embarrassed if someone gets farther along in the game than you did and sees tons of glitches. The good news is you will have plenty of time to practice (assuming you're not up against a really close deadline). I had saved states on MAME for Tapper all the way up to level 9, which I still haven't managed to beat by this article's posting date. That's OK, because at the event, I was sure someone would get up even higher than that, but most people didn't even make it past level 1! A couple of my coworkers at the recruiting event challenged me to see what kind of score I could get on Tapper, but by the time I finally lost, they clearly got sick of watching me and had wandered off. :-P I managed about 25,000 as my highest score that night with the giant NES controller but the next best person only got about 6,000 or so.
I ended up installing RetroPie onto a 64GB SD card in a Raspberry Pi, and then I copied the Tapper hack from a USB stick into the right directory on the file system. After restarting RetroPie, it recognized Tapper as a legitimate option, and I was grateful that MAME's own internal checksums did not stop me from running the game! On my laptop where I was making the hack, I had to open MAME with the command line argument to start Tapper, because loading the hacked Tapper through the regular menu would cause a fatal error telling me the expected checksums mismatched.
So yeah, that's the long story of how a ROM hack gets done... Anyway, I have set up a class at the Dallas Makerspace to go over these techniques in greater detail on 12/4/2016 at 3 PM local time. Join me if you're interested in learning more!
(EDIT: In case you missed the class... I ran it again as a livestream at LPGE 2017 :-P and here are the slides from that version: https://www.slideshare.net/StephenWylie3/process-of-arcade-rom-hacking Good luck, and let me know what you make!)
An interesting work project, right?
I was invited to take my Giant NES Controller to a recruiting event for work taking place at a local brewery. But you can't just have an NES controller without anything to play, right? Thus, I pitched a couple ideas on custom games to go along with the giant controller since I didn't want participants playing anything standard either. The thing they agreed to was to feature the Tapper arcade game, by Bally/Midway in 1983, but modified to show the brewery's logo instead of being Budweiser-branded like it was originally.

My handiwork, about 80% done, and with a tiny glitch. Can you spot the remaining issues?
Now you might be thinking Tapper wasn't ever ported to NES, and that's correct. However, with the help of the MAME arcade emulator and a Hyperkin USB->NES adapter, I could add the Giant NES Controller as an input to this old arcade game, and no one would be the wiser. To facilitate this required lots of learning about MAME, though, because I assumed it would just work right away with my controller. However, the inputs have to be set up to look for button presses coming from the controller; by default, it is only listening for the keyboard. The Giant NES Controller is very unwieldy, so I set it up first with one of the regular NES controllers around the house. The first one I tried was flaky, and I got scared for a moment that my project wouldn't work. However, I grabbed a more reliable one that conveyed the correct button presses rock-solid, and luckily my Giant NES Controller worked just as well anyway.
Ready to look at lots and lots of hex code?
The Tapper hack was done thanks to the help of MAME's awesome tools and a hex editor. I downloaded the ROMs for the game and figured out the naming convention they used to describe what the files are. There are four program ROMs, two background graphics ROMs, at least one foreground graphics ROM, and several others including sound ROMs. Among these, I only needed to edit 3 of the program ROMs and the background ROMs to change the logos on-screen.
The first thing to figure out was how the background tiles were arranged and how the colors were encoded in the background ROMs. Luckily, MAME's tile viewer helped me see which tiles would be where in the memory.

A snapshot of tiles 0xF0 - 0x19F in Major Color Palette 1 using MAME's tile viewer. By this time, I already replaced most of what I needed with Community. Their original arrangement of tiles clearly doesn't lend well to seeing what the intended image was; maybe they were using something like Gray codes to optimize memory accesses. I said "to hell with all that stuff" and opted for sequential tile addresses and image clarity. I haven't noticed a performance difference. :-P
I opened up a hex editor (specifically Hexplorer, which has a color scheme like The Matrix which makes it really easy to detect large vs. small hex values in each byte) to look for similar patterns as what appeared in the tile viewer. I discovered somewhat similar patterns, but not exactly 100% identical. This is because each background ROM actually has a two-bit encoding per pixel of the tile. One ROM contains a background color of index 0-3 and the other ROM contains the palette number of 0-3. Thus, two different-colored pixels could have the same background color index but a different palette number, making them appear different in the game but indistinguishable from each other in the color-index file viewed in the hex editor. I experimented with editing the tiles, and my first couple attempts did not yield the desired results, but eventually I got the hang of it. It's a very tedious process to do by hand.

The first few bytes of both tile files. One is already changing because it's the two-bit encoding of what color to use from the minor palette. The other is not changing yet because the minor palette to use is desired to stay constant for the time being.
The first step is to see how many pixels each tile is in height, and then line up the hex editor so it seems like each change in data or each pattern seems to take up that many rows. (I was afraid the graphics would be compressed with RLE at a minimum, but was extremely pleased that they used just a strange encoding scheme rather than any compression.) This gives you a feel for how many bytes there are per row. Note there are only two bytes per row, and with eight pixels per row, this means each pixel is encoded with just two bytes in each file. It was easier to determine this by looking at the solid colors at the very beginning of the tile files rather than trying to spot a particularly distinctive tile with a letter or graphic because rendering in your head what (for instance) 0x55 looks like versus 0x17 just doesn't come quickly.
Really, it's all just a game of pattern recognition
The next thing was to rearrange the tile order on the screen so I could have it say Community. Community's logo is shorter but wider than Budweiser, so I wanted the tiles remapped so I could maximize the space where I needed it. Now on top of doing pattern recognition for the background ROMs to find the right tile number, I had to analyze the program ROMs to find out how they actually drew the backgrounds. Luckily, this was fairly easy to do. I found out that each tile is represented by two bytes, and there are 32*20 tiles on-screen per level. Thus, there are 1280 bytes in each screen, and roughly 16K worth of screens. But I didn't find that out until I used a bit of intuition while searching the ROMs for the clues from the tile viewer.
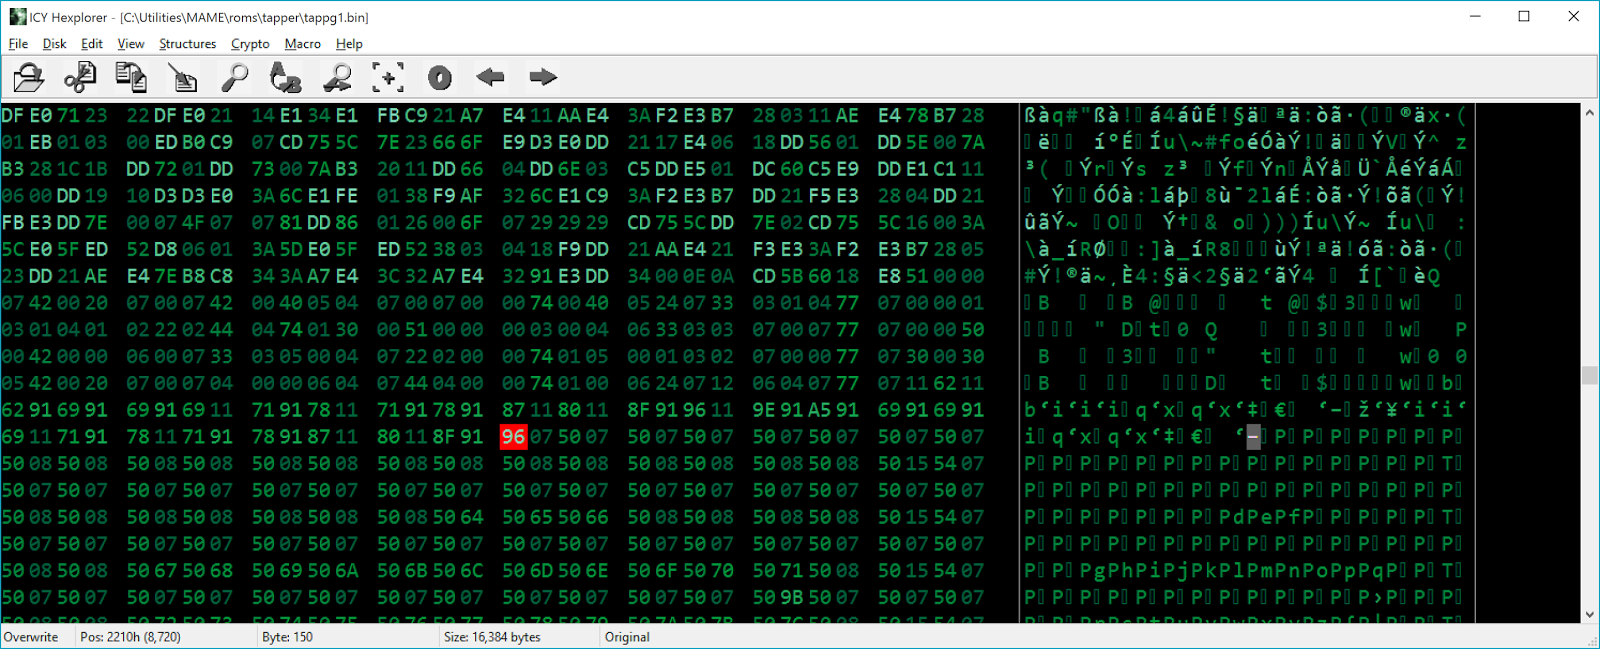
Think about this in terms of probability or from an entropy perspective. The Zilog Z80 instruction set is comprised of a great many opcodes, making big chunks of code look random and uniform (as in a uniform distribution, where all byte values from 0 to 255 seem equally likely) to someone inspecting the machine code in a hex editor. However, the background tiles will seem to take on much less of a uniform distribution, exhibiting tendencies to repeat the same or very similar numbers many times over. You might also start to see some of the tile addresses called out from the tile viewer. In fact, the byte highlighted in red is where the screen for the 1st level begins.
Because the tile information is in program ROMs 1 & 2 (zero-based, as in 0, [1, 2], 3), this presented yet another problem: whenever you change the contents of these ROMs without modifying the checksum in ROM 3, you will get a ROM error corresponding to whichever one(s) are wrong when you boot the game next. I eventually learned how to modify the checksum, but not without using the MAME debugger. This was a real trip, because I used the debugger to figure out when the memory address for any byte in the string "ROM ERROR" was read. (I was extremely fortunate that they used ASCII encoding for this string, otherwise it might have never been apparent where this occurred!) Once the debugger read this address, it continued to read the other addresses in sequence, so I stepped back in the debugger to find out what code caused all the bytes in the ROM to be read. It ended up being somewhat of a hassle to figure the checksums each time, but then a mega hassle to program them in, especially for ROM 3, as you end up creating a circular reference. For instance, if ROM 3 calculates its own checksum to be 1 more than what is programmed into itself, when you modify it to be 1 more, then it calculates it to still be 1 more than the new value you just wrote in. :-P I knew I would be modifying the tile map in ROMs 1 & 2 a whole bunch before I was finally done, so I ended up replacing the code that verifies the checksum with a bunch of NOP instructions so that the game would never call the code that calculates the checksum at boot.
The final thing was to perfect the artwork. Stacy hand-traced the Community logo scaled down to the right size and with the respective palette. I wrote a program that would take a .BMP file consisting of this imagery, along with a "tile file" and "color file", and overwrite the part of the ROMs designated in the tile file with the appropriate 2-bit representation of the colors as dictated by the color file. The color file mapped each color present in the bitmap to a background palette number for that ROM and a color index for the other ROM. The reason I had to write this utility (in Python) was because the other tile editors on romhacking.net didn't seem to be up to the task of parsing old arcade ROMs correctly. The closest I got was one that added an offset to each tile so that it was scooted left a couple pixels. Also it seems like they aren't accustomed to having to deal with *two* asset files for a single tile. I'll have to clean up this utility so it's a little bit more user-friendly and then share it.
Oh, and one other thing: there's yet another palette setting that gets you *four* groups of four groups of four. :-P So now, besides the 2-bit color index and the 2-bit background palette number, there's actually a tile designator that selects which group of 16 colors applies to the tile. This isn't in the background ROMs, but in the program ROMs. What it seems like to me is that the tile ROMs start in a particular address in memory, and then get aliased (e.g. the contents are all the same between addresses 0x3500, 0x5500, 0x7500, and 0x9500) but the higher-order address bits actually indicate which set of 16 colors get used for that tile. Part of that addressing scheme also seems to indicate if the tile should be drawn right-side up or upside-down, but I've only encountered about 6 spaces in the game where this happens and wasn't able to make it do exactly what I wanted. Originally it had drawn in one tile the upper half of the Budweiser bow, and then mirrored it in the tile below, rather than basically duplicating that tile except drawing it upside-down. I wanted it to be changed to a U shape, so I drew in a U into the background ROMs and then thought I changed the tile map to call the new tile un-reflected, but instead what I ended up with is two parallel bars (the top of the U). So that still has yet to be figured out...
ROM Hacking Is For Players Only
As you can imagine, there was lots & lots of play testing along the way. It is important to make sure all the graphics are working just as you expect, otherwise you might get embarrassed if someone gets farther along in the game than you did and sees tons of glitches. The good news is you will have plenty of time to practice (assuming you're not up against a really close deadline). I had saved states on MAME for Tapper all the way up to level 9, which I still haven't managed to beat by this article's posting date. That's OK, because at the event, I was sure someone would get up even higher than that, but most people didn't even make it past level 1! A couple of my coworkers at the recruiting event challenged me to see what kind of score I could get on Tapper, but by the time I finally lost, they clearly got sick of watching me and had wandered off. :-P I managed about 25,000 as my highest score that night with the giant NES controller but the next best person only got about 6,000 or so.
I ended up installing RetroPie onto a 64GB SD card in a Raspberry Pi, and then I copied the Tapper hack from a USB stick into the right directory on the file system. After restarting RetroPie, it recognized Tapper as a legitimate option, and I was grateful that MAME's own internal checksums did not stop me from running the game! On my laptop where I was making the hack, I had to open MAME with the command line argument to start Tapper, because loading the hacked Tapper through the regular menu would cause a fatal error telling me the expected checksums mismatched.
So yeah, that's the long story of how a ROM hack gets done... Anyway, I have set up a class at the Dallas Makerspace to go over these techniques in greater detail on 12/4/2016 at 3 PM local time. Join me if you're interested in learning more!
(EDIT: In case you missed the class... I ran it again as a livestream at LPGE 2017 :-P and here are the slides from that version: https://www.slideshare.net/StephenWylie3/process-of-arcade-rom-hacking Good luck, and let me know what you make!)


Hello from the UK :)
ReplyDeleteI've been trying to do the same thing with Tapper. I've bypassed the checksum, managed to move tiles around, but don't know how to get new tiles into the game. I also had no luck with any of the tile editors. Would you be able to enlighten me with your Python knowledge?
Man, I hate how this thing doesn't notify me when I get comments! :-( Are you still grappling with modifying tiles? If so, and as long as you're OK with adapting the code for your purposes, I can send it your way. I'd like to make it more user-friendly before releasing it to the general public.
DeleteThis is great. I have looked over your powerpoint. I'm so not good at coding. Did you ever release your python script?
ReplyDeleteNot yet. :-( It's definitely on the backlog though. The problem is I'm grappling with how to make it more user-friendly, while also pursuing a ton of other projects ;) . I can release it as-is but you'll have to do *a lot* of stuff by hand or in code.
DeleteCan these same steps be used to edit text with in a arcade ROM?
ReplyDeleteIt depends on how the text is presented. If it is indeed part of a background or a sprite, then you can use the technique above to change the artwork representing the text, or change the arrangement of letters by changing the order/arrangement of background tiles. This would be especially relevant for splash screens or title cards. But for regular text such as prompts and high score callouts, you simply need to open up the ROM in a hex editor. In most cases, the text you wish to change should be easy to find by searching for the string (as text, not as hex).
DeleteI'm not sure if you're familiar with ASCII encoding, but it maps letters, numbers, and symbols into computer code. Most of the time, the strings are ASCII-encoded, but if you aren't able to find the text string easily, then maybe they used a non-ASCII encoding for the text. Don't despair; keep looking for patterns. Think of elementary-school code books like A=1, B=2, etc., and let that thought process guide your search should a simple search not suffice.
Finally, the most important thing: if you find text strings embedded in ROM, you must be careful not to shorten or lengthen the text field. If anything, use spaces to blank out unused letters. If you must shorten or lengthen the text field, you will have a ton of work in front of you as you will need to reset the value of any type of program flow instructions (such as JMP/jump to address and JSR/jump to subbroutine) that cause the program to load a specific address in the ROM after the addresses you affected. It could potentially affect branching instructions too (akin to if/then/else but usually based on comparisons to zero) on certain architectures. Even though a branch might use a relative address rather than an absolute address, you may have changed that relative address -- and the maximum that relative address can be could be limited to just a few bytes. As such, unless you can reconstruct the machine code in a higher-level language or have a lot of patience for testing & debugging, you should definitely avoid changing string lengths in ROM.
Hey Stephen
DeleteThank you for the information.
I just acquired the licenses to a few retro games and the ROMs need to be cleaned up as far as legal and logos go. Would you be interested in helping out?
If so is there a way to reach out to you privately to discuss the details of my project?
Sounds intriguing! I tend to coordinate or bring stuff to several retro game expos throughout the year. If you've got Twitter, follow me at @SWebCEO. Then I'll follow you back and we can start DMing.
DeleteThis comment has been removed by the author.
ReplyDeleteHello, thank you very much for all this information, I am doing a recreation for AMIGA, and the screen is only 320x200, or possibly 320x256 in the pal, although there is a 640 x 200 mode, but the 640x400 is interlaced. So far, I captured the tiles from a movie that recorded mames frame by frame, but I had not been able to pass from level 6, which is the background 3. The mames I have does not have tile viewer, I think because it is not 64 bits and it is 2013, I will try to update it. I need the tiles and the funds, let's see, if I can
ReplyDeleteHi Luis, hopefully you are using saved states to try to advance yourself through the game. However, I don't think you'll have any luck with ripping tiles from the tile editor with a new version of MAME either. I just dealt with the same battle for some Sega Genesis titles, and MAME was not helpful. I ended up recruiting a few programs: Exodus (most helpful, but it's Sega-specific), Tile Molester (which may or may not work for non-SEGA games), and YYCHR (an old standby for NES games but I taught it how to interpret SEGA graphics).
DeleteThere may be some helpful tribal knowledge if you ask around AtariAge or romhacking.net for suggestions about software to extract graphics from Amiga games. Just beware that SEGA games often draw graphics through procedural means, with lots of clever copying between RAM, so the pattern won't necessarily appear in ROM. The same might hold true for Amiga.
Good luck!