It's a Huge 100x Faithful & Functional NES Controller Coffee Table!
A great deal of my time was spent from Memorial Day weekend up through now trying to produce this gigantic piece of functional furniture, and now I am pleased to present an Instructable on how to make one for yourself! Here is a link to the Instructable.
Hint: It is helpful to have a Makerspace handy.
I actually started this project back in January in an effort to get certified on the CNC table router at Dallas Makerspace and start cutting pinball playfields. I made a post previously about my experiences and learnings from that particular endeavor, but as you can tell by the edits, I didn't quite get it right the first time. It took a bit of time before my schedule could clear up in order to try 3D parts again, and lest I forget the procedures involved with using the table router, I thought it'd be prudent to try building an even bigger NES controller than what I did to get certified. My proficiency test involved making a 16x-sized controller, but here I would be attempting a 100x-sized controller that would take up an entire 2'x4' sheet of MDF (medium-density fiberboard).
I measured everything incredibly accurately and made 3D models of various parts in Blender prior to even using the CNC mill, and this took me maybe 20 hours' worth of work for both the 16x and the 100x version. I even brought my laptop into the woodshop and spent about 5 hours cutting and tweaking G-code to make the perfect controller face and route out channels for the wiring and a pocket for the controller PCB to live so it would actually work. Over Memorial Day Weekend, I was out at the Makerspace cutting the controller face from about 9:30 PM until 3:00 AM one night. Fortunately, I came home with a wonderful-looking piece of MDF.
However, the fun had only just begun...
Milling is easy... Sanding and painting take forever!!!
Stacy & I worked feverishly to sand down the controller face and buttons for their initial coat of primer, then sanded everything down again ahead of putting on paint, and then sanded everything down yet again in between each coat of paint. The buttons were finished with copious amounts of lacquer so their finish would stay good. However, the controller face itself was another story. With the multiple colors of paint and lettering required, it took quite a bit of waiting around, placing tape-n'-drape, rearranging the tape-n'-drape, and using a stenc...oh wait... I need to make a stencil for the letters!
This led to another several hours in the CAD tool and with image processing tools. I needed to get high-quality vectors of the letters, and could not trust the vector tracers that muddled pictures of a real controller. Luckily, I found artwork representing the shapes of the various letters on the controller face (namely A, B, SELECT, START, and Nintendo). I spent a while in Photoshop massaging these to lay on top of a blown-up image of the controller, then converted these edges to vectors before re-importing them into VCarve so I could render the stencil design.
Then, there was the dilemma as to what material to use for the stencil. I planned to use Hardboard, but was concerned about the way it cuts leaving tonnes of little fibers that could affect the quality of the edges of the stencil. My other choices were laser cutting or just using a vinyl cutter and making these things all decals. Well, those two wouldn't work because:
- I'm not trained on the laser cutter.
- I didn't have a piece of acrylic handy that would be big enough for the stencil.
- Vinyl decals don't give the same texture as the paint, can't be reused, and would look like garbage if you apply them wrong or get so much as one crinkle or air bubble in it when you apply it.
I wish I could have gotten a lasered stencil, since the edges wouldn't have needed any finishing, but I went with what I knew anyway. This led to many, many more hours sanding the insides of the letters, then painting the letters, then sanding again with finer sandpaper in order to get rid of all the leftover "fuzz" from the hardboard.
Painting the letters was still not easy with the stencil, and they didn't really look good afterward. Fortunately, Stacy has mad skills with knives and detailing brushes, and was able to scrape away excess paint or just paint over it. The fun wasn't over yet, though; the sides of the controller still had to be put on, not to mention the wiring!
Wiring it up for the first time
I spent probably four hours carefully measuring 26AWG wire, splicing it, threading it through the holes of the switch contacts, and soldering it down to make a good connection. Once all was said and done, I wanted to try it out on our NES. The Retron 5 was conveniently located upstairs with Kirby all ready to boot, so all I had to do was plug it in and play. However, I didn't bother putting the buttons on the switches since they weren't necessary to verify the electrical function. It's really difficult to play this controller while sitting on the floor and trying to hit the exact switches. Once I was through with the electronic testing, it was time to put the sides on.
Oh wait, I still need to do something about that PCB. Originally I had cut all the wires so that the PCB would hang outside of the NES controller. I wanted it really to be pocketed inside the controller, so I had to go and shorten all the wires I spent such a long time working on already. After about another 4 hours of untangling wires that had commingled with each other and dealing with weak traces on the PCB that had broken off as a result, I was ready to actually mill out a PCB pocket and glue the Hardboard down. This would permanently enclose the PCB into the Hardboard, as we would liberally apply epoxy to everything to ensure it would be durable and wouldn't budge. We prayed that no damage would happen to the electronics inside the controller after this stage!
Edging and More Painting
Once this was done, I needed to install the edges of the controller in order to give it some depth. I excitedly drilled out a hole that the controller wire would be threaded through, but forgot that the side I drilled into would be the side that faces inward, not outward. So when I threaded the wire through this hole, it ended up being totally the wrong way -- my detailing (beveled edge) was pointed inward, the side piece wouldn't line up flush with the edge of the controller face, and the side piece naturally wanted to be placed above the controller face rather than below it. Wrong, Wrong, WRONG! I ended up having to cut a channel out of the side piece to liberate the wire, and then drill another wire which was also about 1" off from where it needed to be, so I drilled a third hole which was finally right. Once this was done, I cut yet another channel out of the side piece and allowed it (and the other three side pieces) to set overnight.
This process was nerve racking because the controller face was already beautifully painted, yet here we were planting it face-down on a dirty work table getting who knows what kind of scratches on it while we try to put on the sides. Meanwhile, the side with the wire coming out of it loved to fall down, and I was just hoping that no damage was happening to the electronics as a result. I also had the controller face-down to mill out the PCB pocket, which I didn't do originally because I didn't have the exact dimensions of the PCB at the time I was cutting the controller face, and when I went to go do it, the table router was down (along with other big machines) for general electrical repairs to our 3-phase power system. Thus, one of the other members guided me in using a hand-operated mill to mill out the PCB pocket. That was actually kind of fun, as you just go to town on the piece -- no need to do much planning or CAD work or exact measurements on a computer screen.
Final Touches
After the edges were in place, it was time to make them look nice and smooth with the controller face. Despite our best efforts, the edges weren't exactly flush with the controller face, meaning we would need to sand down the edges that were too high. We also used Bondo to fill in the seams, because after we would sand, it would be obvious these were several boards fused together. With the Bondo, it's way less obvious how we fabricated it and the controller face looks great (and seamless). This involved carefully applying Bondo to the seams without getting any on the controller face, and then once it cured, we had to go outside to paint over the Bondo with gray. This was a bit nerve-racking too, with the controller face already being so nicely painted, so we made sure to totally cover it with tape-n'-drape so as not to ruin any of our hard stenciling work.
Oh, and did I mention that by now, it's the night before Let's Play Gaming Expo? We're supposed to load this piece in tomorrow for the exhibition starting the following day. As the first round of gray paint dries, I go to work creating some paper stencils to fill in the "letter holes" -- the middles of characters like A, B, and O. My first technique for dealing with these didn't work at all (where I was trying to keep the middles of the milled-out characters, sand them down carefully, glue them to skewers, and then hope I was holding them down hard enough and evenly while the spray paint is applied). So once these were done, I taped them over the letters and Stacy went at them with a paintbrush.
As she was doing this, I decided to do one final electrical test. I brought our real Nintendo downstairs with Mario Bros/Duck Hunt, and tried to go to town.
Oops...
The A & B buttons, and Start, don't work. Sh*8*@%!!!!.
Luckily Stacy is a smart one, and figured maybe it was a problem with a ground wire becoming disconnected from one of the buttons. I was about to be beside myself with fury and rage if this thing got broken somehow and it was one of the actual button signal wires that got messed up, since that would have been about impossible to fix that close to showtime.
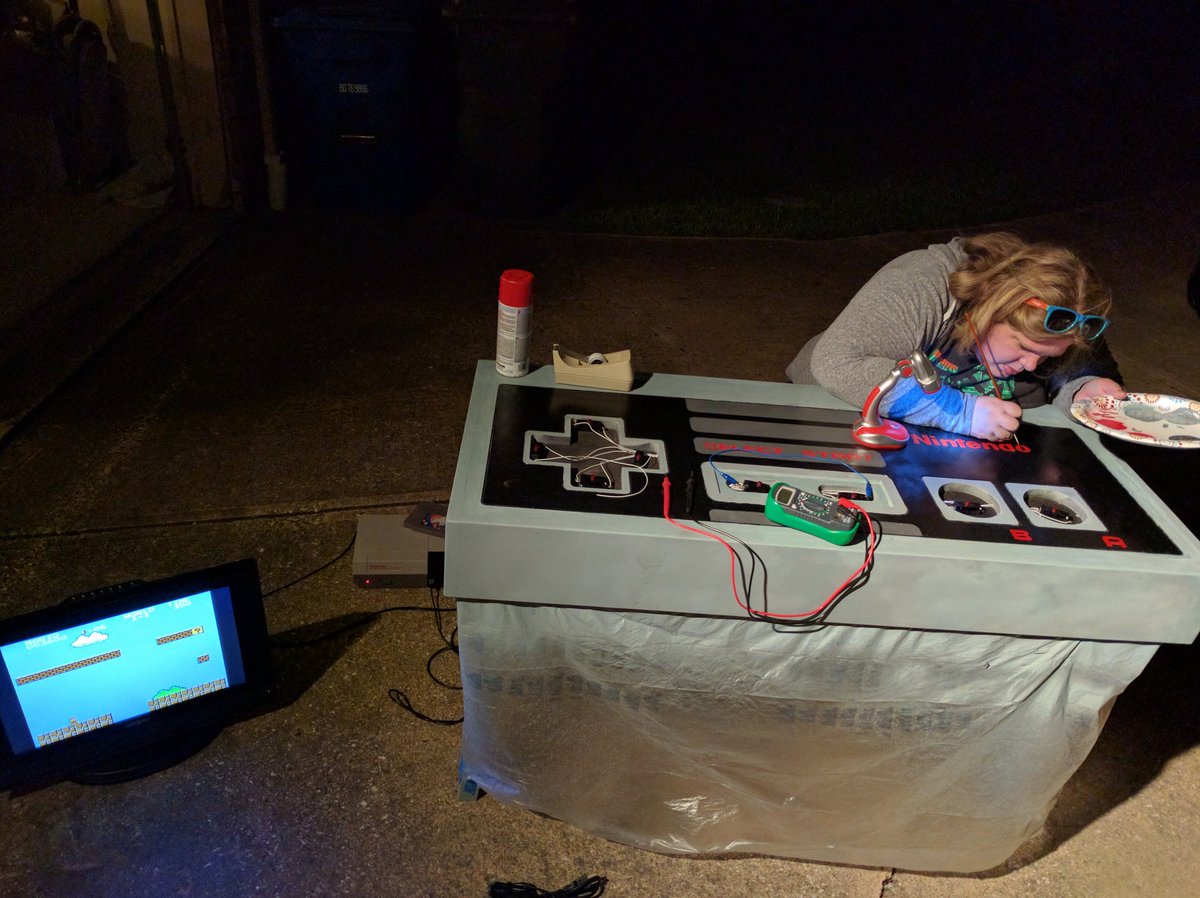
Here we are burning the candle at both ends at the 11th hour. It is almost midnight Friday, 6/17, the day of load-in for LPGE. Look closely at the picture and you'll see a blue alligator wire linking the ground line on SELECT to START. Fortunately, this solved our problem! All the buttons worked fine with this one modification, so I made a wire for this and installed it the next morning (so we wouldn't have the ugly blue wire exposed and messing with gameplay).
Finally, our touch-up work was done, and our gray paint was dry, so we applied a coat of lacquer to dry overnight. Then we had another coat of lacquer dry during the time we were at work. Unfortunately, by this time, the weather was starting to become very hot and humid like it does here every year, so our lacquer has some nasty streaks and imperfections in it. Fortunately, we should be able to hit it with a heat gun and smooth it out.
What a time!
We brought it to the show and it was a big hit. The guys running the free play home console room were ecstatic to have it because apparently one of their other ideas for a big show piece fell through. They plugged it into the old-school console TV lent by the National Videogame Museum in Frisco, and that made it extra-cool and really a sight to behold. It drew all sorts of folks, from little kids who don't know how to do anything but mash buttons all the way to experienced Super Mario Bros. speed runners. Some folks played it solo, others paired up to share the D-pad and A/B buttons. Anyway, I wrote more about the Expo in general and some of my thoughts in the previous post, but didn't mention much about this controller because I knew I'd be writing this much more detailed article next. After all, I put so much effort into this piece this whole year, especially in the past month; it deserves its own article.
And the fun didn't stop there... After the show, I spent a while getting together pictures, documentation, and recollections, while modifying various CAD files to reflect a more sane and logical set of steps (as well as to expunge any trademark violations therein). Including this post, it's taken me about 5 nights' worth of work just for all these documentation and housekeeping types of steps in order to share the mechanics of the project with you!
And here's a little treat for making it to the end: a link to our GitHub page where you can find all the downloadables you would need to make this NES controller for yourself.
And I couldn't have done it without three other folks from the Makerspace: Patrick, Rodney, and Mike, who helped assist me with various tools such as the table saw, wood clamps/nail gun, and the hand router.


Comments
Post a Comment